May 31, 2013

Fairy Houses - DIY Egg Carton Fairy Bird-Houses


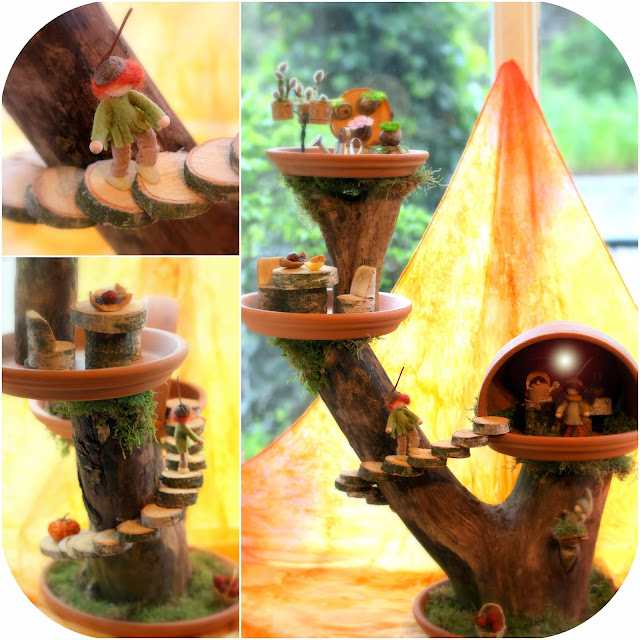
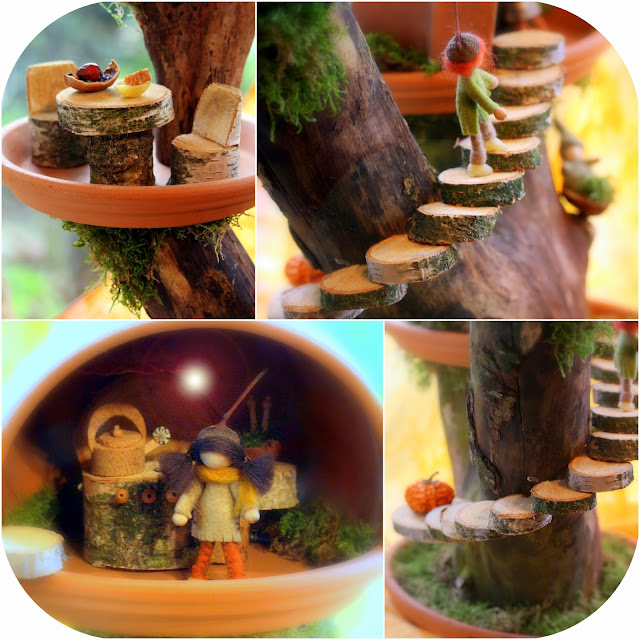
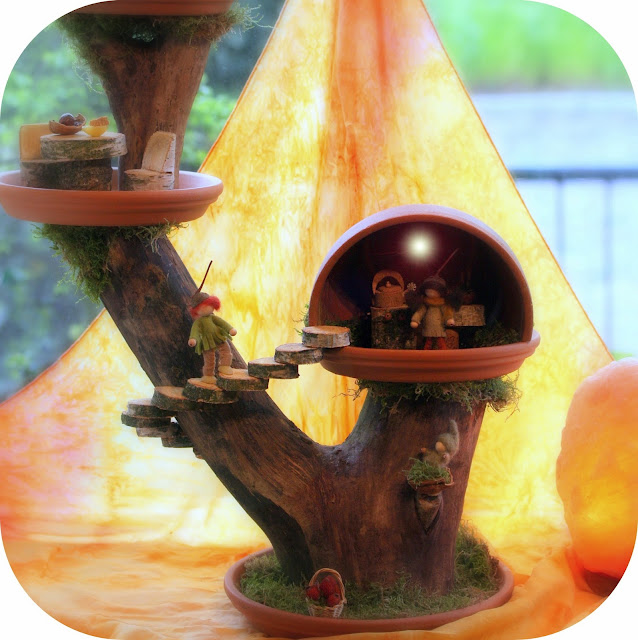
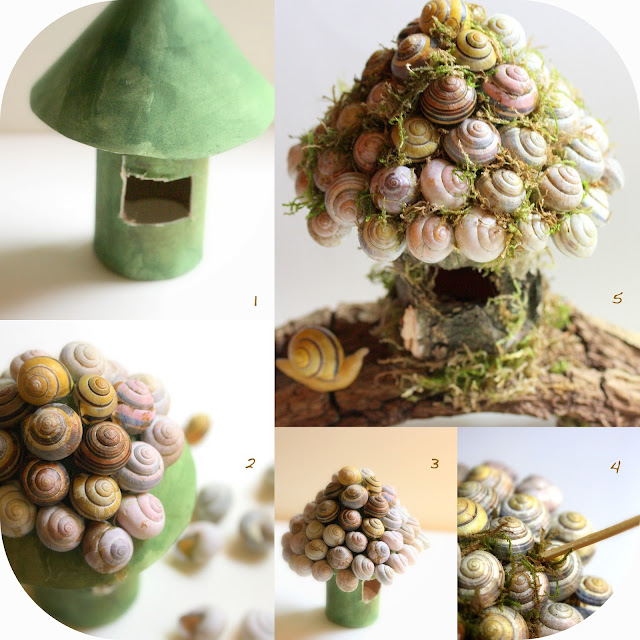
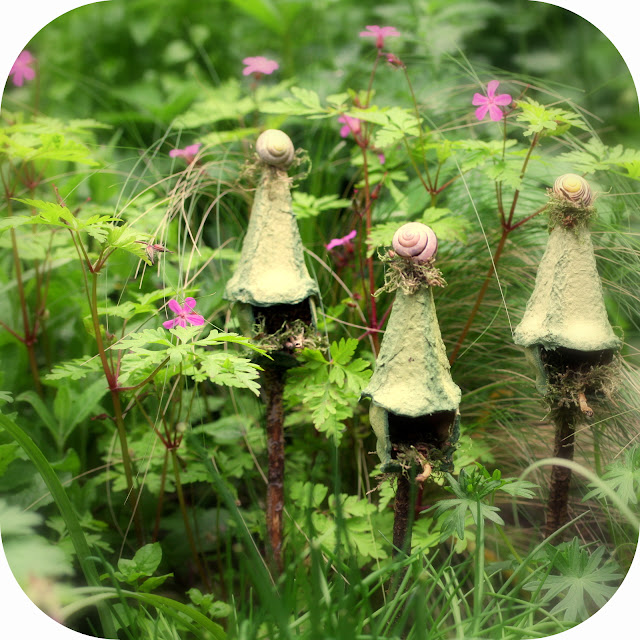
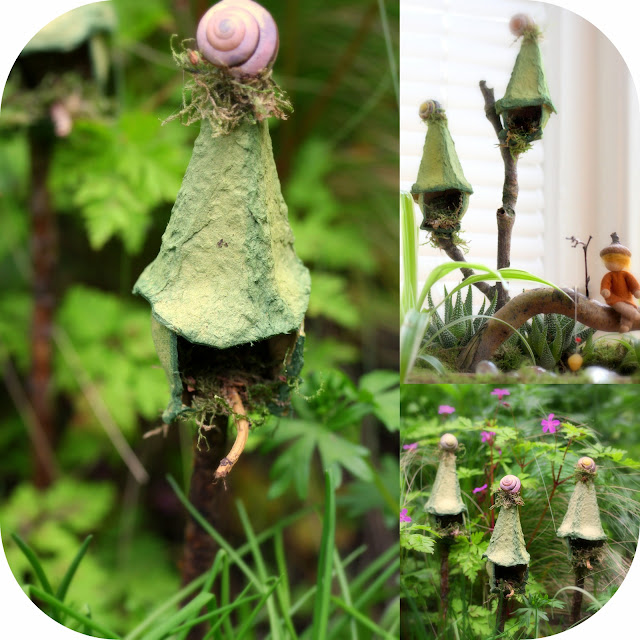
My new idea of creating these fairy (bird-)houses made me so very happy this week! For a while I had been thinking about a way to recycle our empty egg cartons and then I came up with these bird-houses, that look lovely in all kinds of decorations like table pieces, trays with herbs and flower arrangements. They also make lovely ornaments.


Here is how you make them:

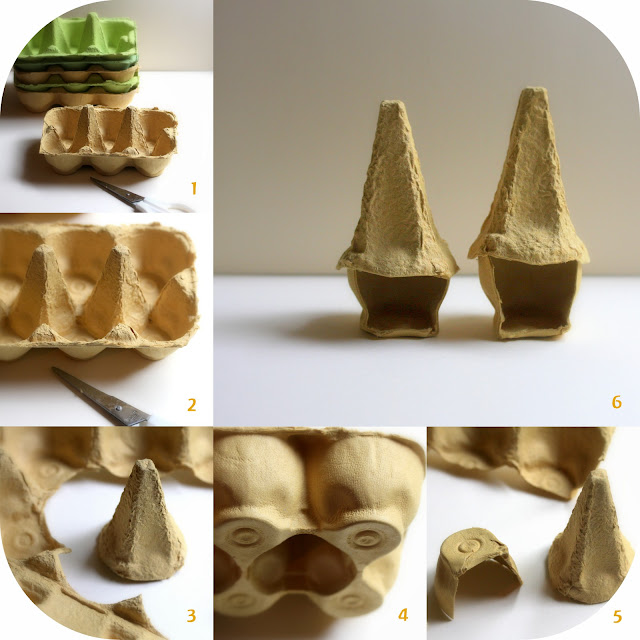
1 - Collect some egg cartons. 
I used a 6 piece egg carton and made 2 houses out of it.
2+3 - Cut the center cones from the egg carton, using scissors.
4 - Now cut the remaining cups from the egg carton. 
The same amount as the cones, 2 in this case.
5 - Glue the cones and the cups together.
6 - The 2 bases are now finished!


Now my favorite part starts... the decoration! I glued the houses on a stick first so I could paint them easily. I used water paint to paint the houses and moss and a small branch to finish them.


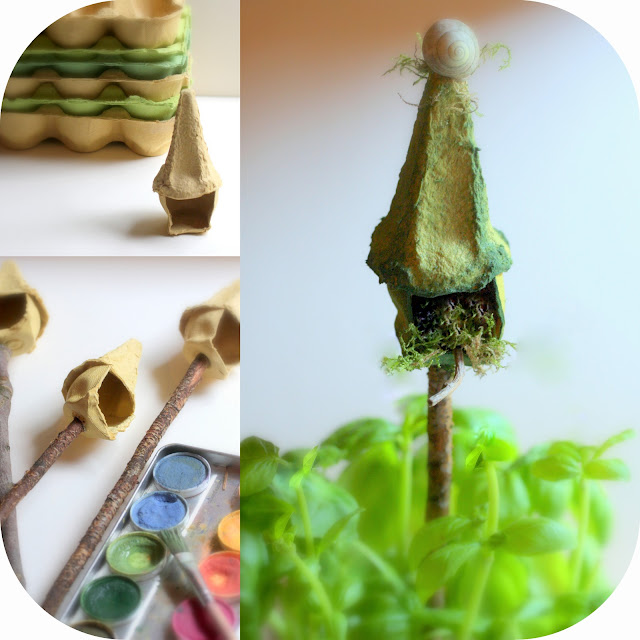
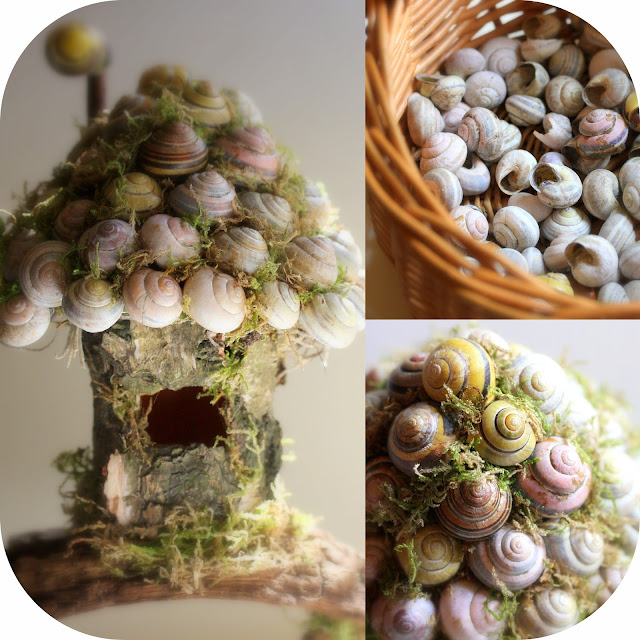
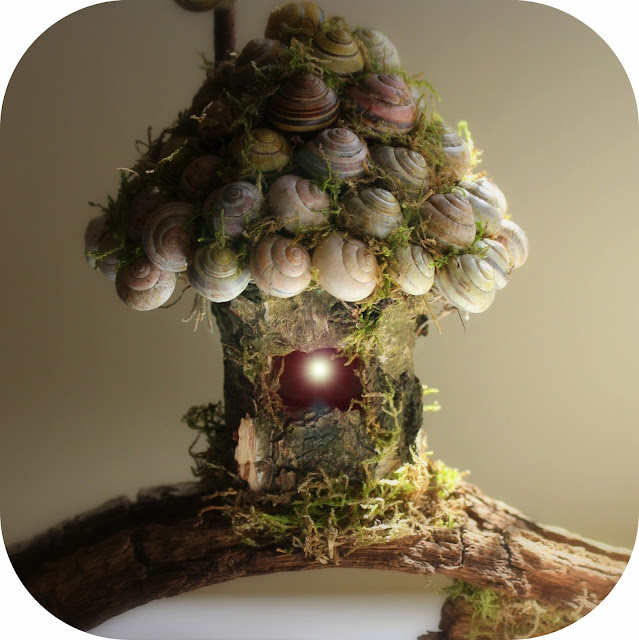
When you work with children you can prepare the houses in advance. Place the houses on sticks in a bowl surrounded by materials like water paint, glue, moss, small branches and snail shells. Then let each child paint and decorate their very own fairy bird-house.


The houses can be placed outdoors on a roofed terrace for example but they are not waterproof. Thanks to their size they look lovely anywhere in or around the house too and they also make lovely presents. I hope you enjoy these tiny houses as much as I do!


Shared on;
Natural Suburbia - Creative Friday
The Magic Onions - Friday's Nature Table
Made by Joey - Sharing Creative Ideas
Frontier Dreams - Keep Calm and Craft on
Like Mama like Daughter - Eco-Kids Tuesday

May 23, 2013

Fairy Houses - Moss Fairy House


This moss fairy house is a cosy and safe home 
to all the tiny magical creatures of the moss lands.


It is simply made of a toiletpaper roll base covered with bark and moss. 
You can find the photo-tutorial for the base here.
Once your fairy house is ready, glue it on a slice of birch
to keep the toiletpaper roll dry when you water the moss.


 By adding and changing small decorations like e.g. planters from snail shells
birch branch step stones and tiny ladders,
you can make the moss house an even more enjoyable place to be!
(and to look at from your couch of course! :)

Shared on;
Natural Suburbia - Creative Friday
Magic Onions - Friday's Nature Table
Made by Joey - Sharing Creative Ideas
Frontier Dreams - Keep Calm and Craft on
Like Mama Like Daughter - Eco-Kids Tuesday

May 18, 2013

Elf Tree House


Inspired by the lovely comment of Enchanted Schoolroom I created this elf tree house. It is made of a tree branch, moss, 4 terracotta water platters in different sizes and half a flower pot (I used a broke one and chipped the sides of with a hammer). With a hot glue gun I attached the branch to the platters and decorated it later with moss, furniture and a stairs out of birch branches. On top of the elf house there is a roof terrace with a garden.


A lovely elf staircase is easy to make. Use birch slices and glue them together with a hot glue gun. Start gluing from the point where you want the stairs to end, work in reverse from top to bottom for a natural curved tree stairs.

For the tree house I cut the branch in two pieces, 
a larger piece (2/3) and a smaller one (1/3) for on top. The large piece I cut from the bottom right and I attached it to the largest platter using a hot glue gun. I made sure it was stabile before attaching the other 2 platters to the branch.

Then I attached the smaller piece of branch to one of the platters and glued the last platter on top. The half flower pot was glued on the other platter and finally I decorated the bottom of all the platters with moss.


For the residents of the house; you can find the patterns and tutorial for the dolls here.

This tree house can be placed indoors or outdoors but beware with younger children because the terracotta platters can break. Instead of an elf house it also makes a lovely plantstand, nature table or a special tablepiece with flowers and candles. Enjoy!
Shared on;
The Magic Onions - Friday's Nature Table
Natural Suburbia - Creative Friday
Mabe by Joey - Sharing Creative Ideas
Like Mama Like Daughter - Eco-Kids Tuesday
Frontier Dreams - Keep Calm Craft On

May 10, 2013

Fairy Houses - Snail Shell Fairy House Tutorial


This week some neighborhood kids surprised me with a basket full of snail shells!
They asked me what I would make with all these shells and I told them that I would try to make another fairy house but this time a house for the Snail Fairy.


This fairy house is built exactly the same way as the cork fairy house but this time I used snail shells instead of cork slices. Finally I painted the shells with a non toxic coating to enhance the colours but you can also use olive oil. Don't oil them in advance otherwise the shells won't stick with the glue.

For the complete step by step photo-tutorial click here


The fairy houses are very light and easy to attach to any surface, this time I used dried bark. I'm in love with the soft tones and spiral forms of these snail shells, each one is unique... just perfect for a fairy house!


Have a magical day!

Shared on;
The Magic Onions - Friday's Nature Table
Natural Suburbia - Creative Friday
Made by Joey - Sharing Creative Ideas
Frontier Dreams - Keep Calm Craft On
Like Mama Like Daughter - Eco-Kids Tuesday

May 8, 2013

Guest Blog Magic Onions!


Today I am a proud guest blogger again at the lovely blog The Magic Onions !
For this heartwarming blog I have created a zen fairy garden.
I hope you will join me today and check it out! 

with love xxx sas


Natural Play - Discovery Garden


In our garden there are no plastic toys and plastic playground equipment but instead I tried to create a discovery garden with simple (recycled) natural materials and plants. And I did my best to attract birds and insects. We enjoy the results every day now...


In our relatively small garden (8x7 meters) there are two trees, a large chestnut and an elm tree. Within a week time the chestnut has changed from buds to fresh green leaves. I am so grateful for her presence because she is cleaning our air (converting carbon dioxide into oxygen).  Lately I had been worrying about two air polluting companies next door. But since this green giant has returned 
from hibernation I am somewhat reassured. 


 Trees are almost instantly creating a magical playground for kids, because these green shelters are harboring and attracting all kinds of birds and insects. The biodiversity increases instantly the moment you plant a native tree! These days I see a lot of trees being cut down to make room for artificial playground for children. But isn't a tree the ultimate playground? My son plays in the shadow of the trees
while  listening to the rustling leaves. And my baby looks mesmerized at the branches dancing in the wind. No artificial toy could ever replace that.


Birds are the crown jewels in our garden. They brighten our day and every time a new species turns up I feel blessed. When you provide shelter, add water bowls and bird feeders and don't clean up your garden too well you probably will be treated to lots of birds.


I do my best to offer many different but simple 
natural playing materials in our garden;

Trunks, bark, gravel, bricks, lava stones, water, (straw) berries, moss, a mini pond, a vegetable container garden, branches and baskets filled with stones, pine cones and (snail) shells. 

I asked friends and family for left over materials and everyone added something small. They often add new found treasuries like stones, plants and trunks.


Ornamental grasses, Japanese maples, bamboo, moss and low evergreen shrubs add great diversity in form and color. My personal favorite is ivy, because of its fresh beautiful colored leaves and the ability to grow everywhere. On top of that, it is evergreen.


Mud turned out to be the best idea of all. My dahlia corner did not make it through the winter and a few days ago I noticed my son playing in the bare sand. I decided to leave it this way and surrounded the play area with trunks and stones.
He spends his days now barefoot, digging and making mud and I am such
a happy mamma!


As a child I had my most happy and magical moments discovering my parents garden. I hope my children will have the same experience. It is a breeding ground for the rest of their lives.


May 5, 2013

Natural Play - Mud Pie Kitchen


Our mud pie kitchen next to our sandpit is made of an old kitchen trolley and a zinc tub. I can really recommend creating one, it is such a wonderful addition to natural play!

These days our son loves to create his famous 'garden soup', 'leaf pancakes' and his all time favorite 'the cork stew'. My suggestion of making lots of mud in the large zinc tub was rejected; "No Mamma that is my dishpan!" (Must be his Virgo ascendant I guess!)


But simple materials like corks, pine cones, shells, stones and all kinds of leaves picked from the garden are warmly welcomed by him. From time to time I can surprise him with potato skins, avocado seeds, egg cartons and paper bags.
And occasionally there are gnome cork boats sailing around in his dishpan. He really enjoys this natural play and I just love to see how he strolls through the garden all day long looking for ingredients for his stews.


In his mud pie kitchen my stainless steel kitchen equipment is prefered above plastic toys because of his need for imitation and realistic sound play. The results are empty kitchen cupboards but a great well-stocked playspace! 


Now I'm off to try a bowl of homemade cork stew. 
I hope you have a wonderful Sunday with your loved ones too.

May 3, 2013

Fairy Houses - Cork Fairy House Tutorial


Our latest fairy house is made of a toiletpaper roll, sturdy paper and cork!
I'm very happy with the result because it is made of recycled materials, 
very light and easy to make even with children.
When you are working with children I recommend preparing the paper houses and corkslices in advance so the children can do the painting and decorating.

Here is my tutorial for you;


Required Materials;  
                                                
- Toiletpaper roll
- Sturdy paper
- Glue and optional a hot glue gun              
- Waterpaint (earth tones)
- Scissors and pen
- Small plate size app. 20 cm
- Corks
- Sharp knife or small handsaw
- Decoration like moss, birch bark,
   tiny branches and snailhouses
- Optional; materials for a fairy
   (felt, pipe cleaners, wooden beads)


1 - Cover the toiletpaper roll with the sturdy paper.
2 - Fold the paper at the ends inside the roll.
3 - Create a circle on a sheet of the paper using the plate as a template.
     Cut it out with scissors and make a cut in the circle all the way to the center.
4 - Create a cone by overlapping the ends of the cut and secure them with glue.
5 - Glue the cone into the top of the paper roll.

These cute little paper houses can also be used for all kinds of different crafts,
 like covering them with fabric or hanging them by threads.


6 - Use a knife or a small handsaw to cut off slices of cork. At this point I started glueing the slices of cork onto the roof of the house, but later I realized that it is better to paint the house first. Let it dry completely and then start adding the corks.
7 - Start at the top of the roof with half slices and work your way down using whole slices.
8 - Now you can fill the cracks between the cork slices with dried moss.


9 - Add some glue with a glue brush and press a bit of dried moss into the cracks using a small stick or the end of a teaspoon.
10 - For the window you can prick a hole in the paper roll and cut out a square with your scissors.
11 - Cover the window frames with bark and paint the inside of the rol in a warm fairy color.
Finally you can create a chimney from a branch, bark and a snail shell.
12 - Optional; create a tiny fairy using this pattern or use another figurine to look out of the window. (I have painted the felt of this fairy afterwards with watercolor paint and a brush)


And there it is a new sweet fairy house! You can hang it or place it on a fairy 'tree' like I did. I used a thick birch branch of app. 25 cm long and 5 slices of birch and 5 corks to create this 'tree'. Using a hot glue gun I attached the slices of birch around the branch using the corks as crutches. Then I glued the branch onto a terracotta plate and decorated it with moss and birch.

In the evening when a small beeswax candle is burning in front of the fairy house it is simply magical!

Shared on;
The Magic Onions - Friday's Nature Table
Natural Suburbia - Creative Friday
Made by Joey - Sharing Creative Ideas
Like Mama Like Daughter - Eco Kids Tuesday
Frontier Dreams - Keep Calm and Craft on
Related Posts Plugin for WordPress, Blogger...